3. Merchant Interface Description
This section describes the necessary information for integrating merchant e-commerce application/ site with the connectIPS Core Module.
3.1. LOGIN PAGE
URL: https://{base_url}/connectipswebgw/loginpage
Method: POST
Data: x-www-form-urlencoded
3.2. PARAMETERS
| # | Field Name | Data Type | Length | Presence | Description |
|---|---|---|---|---|---|
| 1 | MERCHANTID | Integer | 20 | Y | Merchant ID is and unique identifier to identify merchant in the system. Merchant ID will be provided by NCHL upon registering merchant for connectIPS Core Module on banks’ request |
| 2 | APPID | String | 15 | Y | Unique identification, which will be used to identify the accountdetails of the merchant’s application. A merchant can have multiple applications based on different banks account used for various shopping sites. Application Id will be provided by NCHL after registration. |
| 3 | APPNAME | String | 30 | Y | Application name to identify merchant as well as originating application. |
| 4 | TXNID | String | 20 | Y | Transaction Id which will be used to reconcile transaction between merchant and NCHL. Transaction Id must be unique for each app in each post request. |
| 5 | TXNDATE | String | 10 | Y | Transaction Date is the transaction origination date. Date must be in DD-MM-YYYY format. |
| 6 | TXNCRNCY | String | 3 | Y | Currency of transaction. E.g.: NPR |
| 7 | TXNAMT | Integer | 20 | Y | Transaction amount in paisa. |
| 8 | REFERENCEID | String | 20 | Y | Reference Id. Extra transaction information. |
| 9 | REMARKS | String | 50 | Y | Remarks related to the transaction. |
| 10 | PARTICULARS | String | 100 | Y | Additional transaction Remarks. |
| 11 | TOKEN | String | 512 | Y | Token for generated transaction details. Hash value must be generated as a token using transaction detail and private key provided by NCHL. E.g.: fRLMniZSmpKs/FrO7w53NmlIiXKX1+AQdhJUgBO51S+Ho9Zz YOICghA5kW3hS/B1nf2EY5zziutxGejSBQ8NFgQo7MWYi/QP nSZ6jByI1gzRnx73/EUZmG9tRgRdDq2Zs99Y8m4by2uEQo0 ZldbTHmO4kRuifUTSurFn+zdbprg= |
3.3. PROCESS TO GENERATE TOKEN
3.3.1. Generate string based on transaction detail in below format.
String message = “MERCHANTID=<Value of MERCHANTID>, APPID=<Value of APPID>, APPNAME=<Value of APPNAME>, TXNID=<Value of TXNID>,TXNDATE=<Value of TXNDATE>,TXNCRNCY=<Value of TXNCRNCY>,TXNAMT=<Value of TXNAMT>,REFERENCEID=<Value of REFERENCEID>,REMARKS=<Value of REMARKS>,PARTICULARS=<Value of PARTICULARS>,TOKEN=TOKEN”
i. Generate message digest of the token string using SHA256 hashing algorithm.
ii. Sign the message digest using the digital certificate private key (pfx file/keystore). The digital signature algorithm will be the SHA256withRSA. Private key file will be CREDITOR.pfx for testing purpose.
iii. Convert the signed token above in step ii to base64 encoding. iv. Pass this signature string from step iii to the “token” field of the request message.
Example:
Text to be signature:
MERCHANTID=550,APPID=MER-550-APP-1,APPNAME=Test,TXNID=txn123,TXNDATE=15-03-2022,TXNCRNCY=NPR,TXNAMT=500,REFERENCEID=REF-001,REMARKS=RMKS-001,PARTICULARS=PART-001,TOKEN=TOKEN
Signature text:
QYj4di1m4V/ahhrw4QcNtPvOv4pYiJE+Ur0Ewnue4NyYjK8UlruUDVLrR4i6vrMAcyKGK1tR8riwH8x4DtN22 QsLGHMCM5mDjhJiae5D0AMbr9jrOtomlh0P1IrTy5I8iTHwoNJV2u4vtGYBgAxJ2IE5YxPaKNnqH5nxQFhjUgA=
Note: Signature text as above can be generated as an example only. After getting correct signature value, use your own provided details.
3.4. RESPONSE
Example Request
    <form action="baseurl/connectipswebgw/loginpage" method="post">
    <label for="MERCHANTID">MERCHANT ID</label>
    <input type="text" name="MERCHANTID" id="MERCHANTID" value="550"/>

    <label for="APPID">APP ID</label>
    <input type="text" name="APPID" id="APPID" value="MER-550-APP-1"/>

    <label for="APPNAME">APP NAME</label>
    <input type="text" name="APPNAME" id="APPNAME" value="Test Merchant Name"/>

    <label for="TXNID">TXN ID</label>
    <input type="text" name="TXNID" id="TXNID" value="txn-123"/>

    <label for="TXNDATE">TXN DATE</label>
    <input type="text" name="TXNDATE" id="TXNDATE" value="15-03-2022"/>

    <label for="TXNCRNCY">TXN CRNCY</label>
    <input type="text" name="TXNCRNCY" id="TXNCRNCY" value="NPR"/>

    <label for="TXNAMT">TXN AMT</label>
    <input type="text" name="TXNAMT" id="TXNAMT" value="500"/>

    <label for="REFERENCEID">REFERENCE ID</label>
    <input type="text" name="REFERENCEID" id="REFERENCEID" value="REF-001"/>

    <label for="REMARKS">REMARKS</label>
    <input type="text" name="REMARKS" id="REMARKS" value="RMKS-001"/>

    <label for="PARTICULARS">PARTICULARS</label>
    <input type="text" name="PARTICULARS" id="PARTICULARS" value="PART-001"/>

    <label for="TOKEN">TOKEN</label>
    <input type="text" name="TOKEN" id="TOKEN" value="fRLMniZSmpKs/FrO7w53NmlIiXKX1+AQdhJUgBO51S+Ho9ZzYOICghA5kW3hS/B1nf2EY5zziutxGejSBQ8NFgQo7MWYi/QPnSZ6jByI1gzRnx73/EUZmG9tRgRdDq2Zs99Y8m4by2uEQo0ZldbTHmO4kRuifUTSur Fn+zdbprg=" />

    <br>
    <input type="submit" value="Submit">
</form>
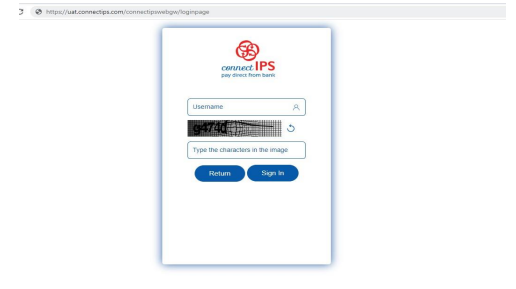
Fig:1. Redirection to connectIPS after posting form data
3.5. USER REDIRECTION
Before performing transactions, a static pair of successURL and failureURL has to be provided to the connectIPS integration support team. connectIPS itself handles user redirection and sends the user to whichever URL provided for testing after entering the OTP. URLs of localhost is also supported while testing. Please provide full URL to the connectIPS integration support team.
In each instance of redirection, connectIPS will append only TXNID parameter at the end of the URL; referring to which, payment validation URL has to be called to validate payment from merchant’s end.
Sample URL:
SuccessURL: https://www.testsuccessurl.com/transactionResponse/success?TXNID=txn-123
FailureURL: https://www.testfailureurl.com/transactionResponse/failure?TXNID=txn-123
Note: This TXNID is the same parameter that is passed in the form data for login URL.
successURL is the URL where the transaction creating user will be redirected after entering OTP in the transaction creation page whereas, failureURL is the URL called when the user clicks on “Return” button in login page or “Return to Creditor Site” button in transaction creation page.

Fig:2. Return button redirects to failureURL
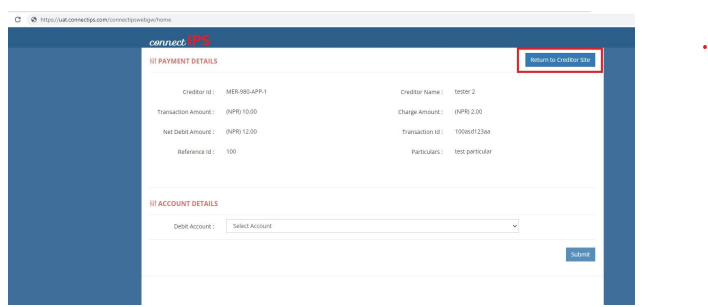
Fig:3. Return to Creditor Side button redirects to failureURL
Incase if a transaction fails at connectIPS end, the user will be shown an error message in the transaction page itself as below:

Fig:4. Transaction failure at connectIPS